We have come up with this new article that is useful for understanding the Navigation drawer and its page routing throughout the application.
The navigation drawer concept actually comes from the android native applications. In android, we use fragments and drawer files for managing navigation but it is bit different in flutter to create drawer and page routes, this article will help you create the same in a flutter application.
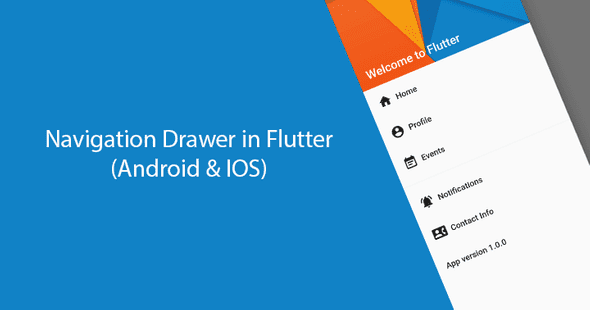
Navigation drawer
The navigation drawer is useful when you want to perform different page actions and events on different pages with the use of switching pages in the main drawer page.
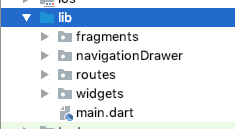
Create a project structure like this
The navigation drawer is one type of listview which is used for switch pages in the application as a user will select an option.
You can create drawer in a different way like
- Add only the body section with a list of actions.
- Divide drawer into two sections: Header and body
- Divide drawer into three sections: header, body, and footer.
AppDrawer
In flutter, we code inside
<project-package>/lib/
Create navigationDrawer.dart file inside lib/navigationDrawer folder
class navigationDrawer extends StatelessWidget {
 @override
 Widget build(BuildContext context) {
   return Drawer(
     child: ListView(
       padding: EdgeInsets.zero,
       children: <Widget>[
         createDrawerHeader(),
         createDrawerBodyItem(
           icon: Icons.home,text: 'Home'),
         createDrawerBodyItem(
           icon: Icons.account_circle,text: 'Profile'),

         createDrawerBodyItem(
           icon: Icons.event_note,text: 'Events'),
         Divider(),
         createDrawerBodyItem(
           icon: Icons.notifications_active,text: 'Notifications'),
         createDrawerBodyItem(
           icon: Icons.contact_phone,text: 'Contact Info'),
         ListTile(
           title: Text('App version 1.0.0'),
           onTap: () {},
         ),
       ],
     ),
   );
 }
}
Create Navigation drawer’s widgets like _createDrawerHeader(), _creeateDrawerBodyItem() inside lib/widgets folder
createDrawerHeader.dart
Widget createDrawerHeader() {
 return DrawerHeader(
     margin: EdgeInsets.zero,
     padding: EdgeInsets.zero,
     decoration: BoxDecoration(
         image: DecorationImage(
             fit: BoxFit.fill,
             image:  AssetImage('images/bg_header.jpeg'))),
     child: Stack(children: <Widget>[
       Positioned(
           bottom: 12.0,
           left: 16.0,
           child: Text("Welcome to Flutter",
               style: TextStyle(
                   color: Colors.white,
                   fontSize: 20.0,
                   fontWeight: FontWeight.w500))),
     ]));
}
Add drawer Items
Create drawer body items in lib/widget folder with the name createDrawerBodyItem.dart
Widget createDrawerBodyItem(
   {IconData icon, String text, GestureTapCallback onTap}) {
 return ListTile(
   title: Row(
     children: <Widget>[
       Icon(icon),
       Padding(
         padding: EdgeInsets.only(left: 8.0),
         child: Text(text),
       )
     ],
   ),
   onTap: onTap,
 );
}
After creating a Navigation drawer for App, Now create routes for the open page as per the selecting option from the drawer.
When Should You Hire Dedicated Developers for Your Project
Read MoreFor creating routes create pageRoute.dart in lib/routes folder.
class pageRoutes {
 static const String home = homePage.routeName;
 static const String contact = contactPage.routeName;
 static const String event = eventPage.routeName;
 static const String profile = profilePage.routeName;
 static const String notification = notificationPage.routeName;
}
Adding Fragment Pages
Create fragment pages in lib/Fragments folder.
homePage.dart
class homePage extends StatelessWidget {
 static const String routeName = '/homePage';

 @override
 Widget build(BuildContext context) {
   return new Scaffold(
       appBar: AppBar(
         title: Text("Home"),
       ),
       drawer: navigationDrawer(),
              body: Center(child: Text("This is home page")));
 }
}
contactPage.dart
class contactPage extends StatelessWidget {
 static const String routeName = '/contactPage';

 @override
 Widget build(BuildContext context) {
   return new Scaffold(
       appBar: AppBar(
         title: Text("Contacts"),
       ),
       drawer: navigationDrawer(),
       body: Center(child: Text("This is contacts page")));
 }
}
eventPage.dart
class eventPage extends StatelessWidget {
 static const String routeName = '/eventPage';

 @override
 Widget build(BuildContext context) {
   return new Scaffold(
       appBar: AppBar(
         title: Text("Events"),
       ),
       drawer: navigationDrawer(),
       body: Center(child: Text("Hey! this is events list page")));
 }
}
notificationPage.dart
class notificationPage extends StatelessWidget {
 static const String routeName = '/notificationPage';

 @override
 Widget build(BuildContext context) {
   return new Scaffold(
       appBar: AppBar(
         title: Text("Notifications"),
       ),
       drawer: navigationDrawer(),
       body: Center(child: Text("This is notification page")));
 }
}
profilePage.dart
class profilePage extends StatelessWidget {
 static const String routeName = '/profilePage';

 @override
 Widget build(BuildContext context) {
   return new Scaffold(
       appBar: AppBar(
         title: Text("My Profile"),
       ),
       drawer: navigationDrawer(),
       body: Center(child: Text("This is profile page")));
 }
}
At the end
After creating a drawer header, drawer body item as well as drawer footer now its time to add set onTap() event in drawer items,so that the user can switch files as per his choice of option from drawer body item.
Edit some parts of the code in navigationDrawer.dart File
class navigationDrawer extends StatelessWidget {
 @override
 Widget build(BuildContext context) {
   return Drawer(
     child: ListView(
       padding: EdgeInsets.zero,
       children: <Widget>[
         createDrawerHeader(),
         createDrawerBodyItem(
           icon: Icons.home,
           text: 'Home',
           onTap: () =>
               Navigator.pushReplacementNamed(context, pageRoutes.home),
         ),
         createDrawerBodyItem(
           icon: Icons.account_circle,
           text: 'Profile',
           onTap: () =>
               Navigator.pushReplacementNamed(context, pageRoutes.profile),
         ),

         createDrawerBodyItem(
           icon: Icons.event_note,
           text: 'Events',
           onTap: () =>
               Navigator.pushReplacementNamed(context, pageRoutes.event),
         ),
         Divider(),
         createDrawerBodyItem(
           icon: Icons.notifications_active,
           text: 'Notifications',
           onTap: () =>
               Navigator.pushReplacementNamed(context, pageRoutes.notification),
         ),
         createDrawerBodyItem(
           icon: Icons.contact_phone,
           text: 'Contact Info',
           onTap: () =>
               Navigator.pushReplacementNamed(context, pageRoutes.contact),
         ),
         ListTile(
           title: Text('App version 1.0.0'),
           onTap: () {},
         ),
       ],
     ),
   );
 }
}
Made changes in main.dart file as well as set Default fragment and page routes in file when application starts.
void main() => runApp(new MyApp());

class MyApp extends StatelessWidget {
 // This widget is the root of your application.
 @override
 Widget build(BuildContext context) {
   return new MaterialApp(
     title: 'NavigationDrawer Demo',
     theme: new ThemeData(
       primarySwatch: Colors.blue,
     ),
     home: homePage(),
     routes:  {
       pageRoutes.home: (context) => homePage(),
       pageRoutes.contact: (context) => contactPage(),
       pageRoutes.event: (context) => eventPage(),
       pageRoutes.profile: (context) => profilePage(),
       pageRoutes.notification: (context) => notificationPage(),
     },
   );
 }
}
Result
Run the application and you will see the result like this
· · · ·Third Rock Techkno is a leading IT services company. We are a top-ranked web, voice and mobile app development company with over 10 years of experience. Client success forms the core of our value system.
We have expertise in the latest technologies including angular, react native, iOs, Android and more. Third Rock Techkno has developed smart, scalable and innovative solutions for clients across a host of industries.
Our team of dedicated developers combine their knowledge and skills to develop and deliver web and mobile apps that boost business and increase output for our clients.