

Table of Contents
How to Create a basic angular elements and use it in our application:
Angular elements are new HTML custom elements which are angular components packaged as custom elements.
Custom elements or web components give developers the ability to extend and create their own tags.It can be used without any dependencies. So you can use your custom elements in your React, Angular and Vue applications. You can also use it with your backend.
All the advantages of web components applies in Angular elements.
Why do we need it?
If your Application is small, then you can manage it easily. But If your Application is higher level which contains many sub applications with different frameworks then it is hard to move through.
Some of the modules/components which are used very often inside the application and every time we want to release a new version of this application then we also need to release and redeploy this sub application to get the newer version of application. Sometimes our sub application deployed once a week, or sometimes once a month so there is a situation when we have a different version of the same components, this can be handled by elements.
You can serve your element on the web. And your application references it just with the URL and gets the latest version of elements without need to redeploy. So you can release part of the application independently. So With the help of this complexity of application goes down.
With the help of Angular Elements we can also upgrade AngularJS application into Angular.
Angular Elements are:
- More reusable
- They are framework independent
- With the use of this we have less boilerplate
How to Create a basic angular elements and use it in our application:
Let's create angular elements project and add angular element in our project by
ng new angularElements
ng add @angular/elements
@angular/elements package creates a custom-element API which packs an angular component as a custom element.
Custom elements requires ES2015 classes. Support of custom elements and Es2015 may not be available in all the browser for that we need to use polyfill to support in that browser. For that we need to install webcomponents
npm install @webcomponents/custom-elementsAfter this package installed in your Application, open "pollyfill.js" and add this two lines in that file.
import '@webcomponents/custom-elements/src/native-shim';
import '@webcomponents/custom-elements/custom-elements.min';
To use a component as angular element we need to create component first or we can use existing components. Always use the ‘kebab-case’ form to generate components.
ng generate component register-formTo use our component as a custom elements:
Angular bundle include those components in the final bundle that has been referenced in the template, other components are ignored by it. So we need to tell angular to include this component in final bundle by adding them in entryComponent array of appModule. This component are Loaded dynamically.
Here I’m using AppComponent, RegisterFormComponent for custom elements.
@NgModule({
    declarations: [
      AppComponent,
      RegisterComponent,
      RegisterFormComponent
    ],
    imports: [
      BrowserModule,
      AppRoutingModule,
      FormsModule
    ],
    providers: [],
    schemas: [ CUSTOM_ELEMENTS_SCHEMA ],
    entryComponents: [AppComponent,RegisterFormComponent] //It will add component dynamically
  })
  export class AppModule {
    constructor(private injector: Injector) {}

    ngDoBootstrap() {

      // using createCustomElement from angular package it will convert angular component to stander web component
      const mainPage = createCustomElement(AppComponent,
        { injector: this.injector });
      // using built in the browser to create your own custome element name
      customElements.define('main-page', mainPage);

      const register = createCustomElement(RegisterFormComponent,
                                   { injector: this.injector });
      customElements.define('register-form', register);
    }
  }
ngDoBootstrap() inside AppModule tells Angular to handle bootstrapping for us. createCustomElement() method takes two parameters:
1. component name which you want to use as custom element
2. Injector: it’s responsible for creating instances of components as a custom element.
This process implements a constructor class which is a self-bootstrapping instance of your component. customElement.define() contains the name of the element.
Passing the string “app-main-page” inside customElements means that the <app-main-page> element is registered and we can use it inside DOM. We can change the name of the element inside define(), not required to be exact as angular component name. You can also write createCustomElement() and define() method inside constructor of the component.
<div class="page-wrapper bg-gra-02 p-t-130 p-b-100 font-poppins" *ngIf="!showRegisterForm">
      <div class="wrapper wrapper--w680" *ngIf="showLoginForm">
          <div class="card card-4">
              <div class="card-body">
                  <h2 class="title">SIGN IN NOW</h2>
                  <form (ngSubmit)="submitData(registerForm.form);" #registerForm="ngForm">
                      <div class="row row-space">
                          <div class="col-2">
                              <div class="input-group">
                                  <label class="label">Email</label>
                                  <input class="input--style-4" type="email" name="email" ngModel #emailField="ngModel" placeholder="please enter email address">
                              </div>
                          </div>
                      </div>
                      <div class="row row-space">
                        <div class="col-2">
                            <div class="input-group">
                                <label class="label">Password</label>
                                <input class="input--style-4" type="password" name="password" ngModel placeholder="please enter your password">
                            </div>
                        </div>
                     </div>
                      <div class="p-t-15">
                          <button class="btn btn--radius-2 btn--blue" type="submit">Submit</button>

                          <p class="label" style="padding-top: 15px;padding-bottom: 15px; text-align: center;">OR</p>

                          <button class="btn btn--radius-2 btn--blue" (click)="showRegisterPage($event)">Sign Up</button>
                      </div>
                  </form>
              </div>
          </div>
      </div>

      <div class="register-message" *ngIf="!showLoginForm">
        <p class="text">Welcome</p>
      </div>
    </div>

    <div *ngIf="showRegisterForm">
        <app-register-form></app-register-form>
</div>Here I'm using an “app-main-page” element for the login screen in which I will show an app-register-form element if the user is not registered or the user clicks on the “Sign Up” button.
 @Component({
    selector: 'app-root',
    templateUrl: './app.component.html',
    styleUrls: ['./app.component.scss']
  })
  export class AppComponent implements OnInit{
    title = 'angularElements';
    showLoginForm = true;
    showRegisterForm = false;

    ngOnInit() {

    }

    submitData(form) {
      if (form.value.email === user.email) {
        alert('sign in successful');
        this.showLoginForm = false;
      } else {
        window.alert('you are not register. please register');
        this.showLoginForm = false;
        this.showRegisterForm = true;
      }
    }
    showRegisterPage(event) {
      this.showLoginForm = false;
      this.showRegisterForm = true;
    }
  }
<div class="page-wrapper bg-gra-02 p-t-130 p-b-100 font-poppins">
        <div class="wrapper wrapper--w680">
            <div class="card card-4">
                <div class="card-body" *ngIf="!isRegister">
                    <h2 class="title">REGISTER NOW</h2>
                    <form (ngSubmit)="submitData(registerForm.form);" #registerForm="ngForm">
                        <div class="row row-space">
                            <div class="col-2">
                                <div class="input-group">
                                    <label class="label">Name</label>
                                    <input class="input--style-4" type="text" name="name" ngModel #nameField="ngModel"
                                        placeholder="please enter username">
                                </div>
                            </div>
                        </div>
                        <div class="row row-space">
                            <div class="col-2">
                                <div class="input-group">
                                    <label class="label">Email</label>
                                    <input class="input--style-4" type="email" name="email" ngModel #emailField="ngModel"
                                        placeholder="please enter email Id">
                                </div>
                            </div>
                        </div>
                        <div class="row row-space">
                            <div class="col-2">
                                <div class="input-group">
                                    <label class="label">Password</label>
                                    <input class="input--style-4" type="password" name="password" ngModel
                                        #password="ngModel" placeholder="please enter password">
                                </div>
                            </div>
                        </div>
                        <div class="p-t-15">
                            <button class="btn btn--radius-2 btn--blue" type="submit">Submit</button>
                        </div>
                    </form>
                </div>
            </div>
        </div>

        <div class="register-message" *ngIf="isRegister">
            <p class="text">Welcome {{userName}}</p>
        </div>

</div> @Component({
selector: 'app-register-form',
templateUrl: './register-form.component.html',
styleUrls: ['./register-form.component.scss']
})
export class RegisterFormComponent implements OnInit {
userName = '';
isRegister = false;
constructor() { }
ngOnInit(): void {
}
submitData(form){
console.log(form.value);
window.alert('registration successful');
this.userName = form.value.name;
this.isRegister = true;
}
}To use this element we have to add element tag name statically inside "index.html" using <script> tag or we can use it dynamically.
To Package all this thing:
Make build using angular-cli:
ng build --prod --output-hashing noneThis will generate a dist folder with a set of javascript file. like this
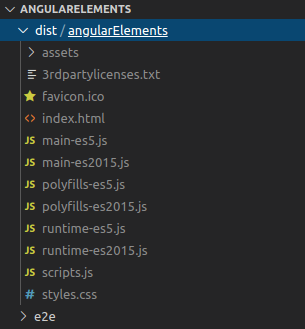
So when we want to use our angular elements we have to add these JavaScript files in our project, and better solution for not to do this we can combine these files in one file and use it whenever we want to use our angular elements.
For that we require two additional packages "concat" and "fs-extra"
npm install --save-dev concat fs-extra Now create a js file in root of your project folder, here I’m creating elements-build.js
const fs = require('fs-extra');
const concat = require('concat');
(async function build() {
const files = [
'./dist/angularElements/runtime-es2015.js',
'./dist/angularElements/runtime-es5.js',
'./dist/angularElements/main-es2015.js',
'./dist/angularElements/polyfills-es5.js',
'./dist/angularElements/scripts.js',
'./dist/angularElements/main-es5.js',
]
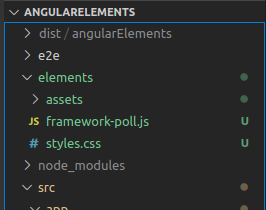
await fs.ensureDir('elements')
await concat(files, 'elements/framework-poll.js');
await fs.copyFile('./dist/angularElements/styles.css', 'elements/styles.css')
await fs.copy('./dist/angularElements/assets/', 'elements/assets/' )
})();This will copy all the JavaScript files inside one file called “framework-poll.js” and also copy CSS files inside elements folder.
Now add this inside "package.json" which is run when we want to make build for elements.
"build:elements": "ng build --prod --output-hashing none && node elements-build.js""scripts": {
"ng": "ng",
"start": "ng serve",
"build": "ng build",
"test": "ng test",
"lint": "ng lint",
"e2e": "ng e2e",
"build:elements": "ng build --prod --output-hashing none && node elements-build.js"
},
"private": true,In terminal run "npm run build:elements" which will generate a dist and elements folder. Inside elements folders there’s “framework-poll,js” file which contains previous JavaScript files.
To use our angular elements we have to add angular elements tag name which we have define inside appModule with the above JavaScript file.
 <!doctype html>
    <html lang="en">

    <head>
      <meta charset="utf-8">
      <title>AngularElements</title>
      <base href="/">
      <meta name="viewport" content="width=device-width, initial-scale=1">
      <link rel="icon" type="image/x-icon" href="favicon.ico">

      <!-- Font Icon -->
      <link rel="stylesheet" href="fonts/material-icon/css/material-design-iconic-font.min.css">

      <!-- Main css -->
      <link rel="stylesheet" href="css/style.css">
      </script>
    </head>

    <body>
      <app-main-page></app-main-page>
      <script type="text/javascript" src="framework-poll.js"></script>
    </body>

</html>And our angular elements starts to work when we run this file.
To run this locally , we have to add index.html file where “framework-poll.js” placed. Here it is inside elements folder. And serve this file using http-server. Just ensure that tag name is same as define inside app.module.ts file.
Angular element is just an HTML element. So we can do all the things which we do on simple html tag like, set it’s attributes either by static declaration in template or by calling setAttribute method, interpolation, input and output operation. We can also hide or show based on condition like we do above for registration form.
Output for login screen, For login screen element tag name is <app-main-page>.
Output for registration screen, For this screen element tag name is <app-register-form> which is placed inside html file of app.component.html.
This screen opens when we click on Sign up button
This screen open when user is not registered and when he tries to login without registration.
Conclusion
This is how we can convert our standard angular components as angular element and use it with angular framework or any other framework.